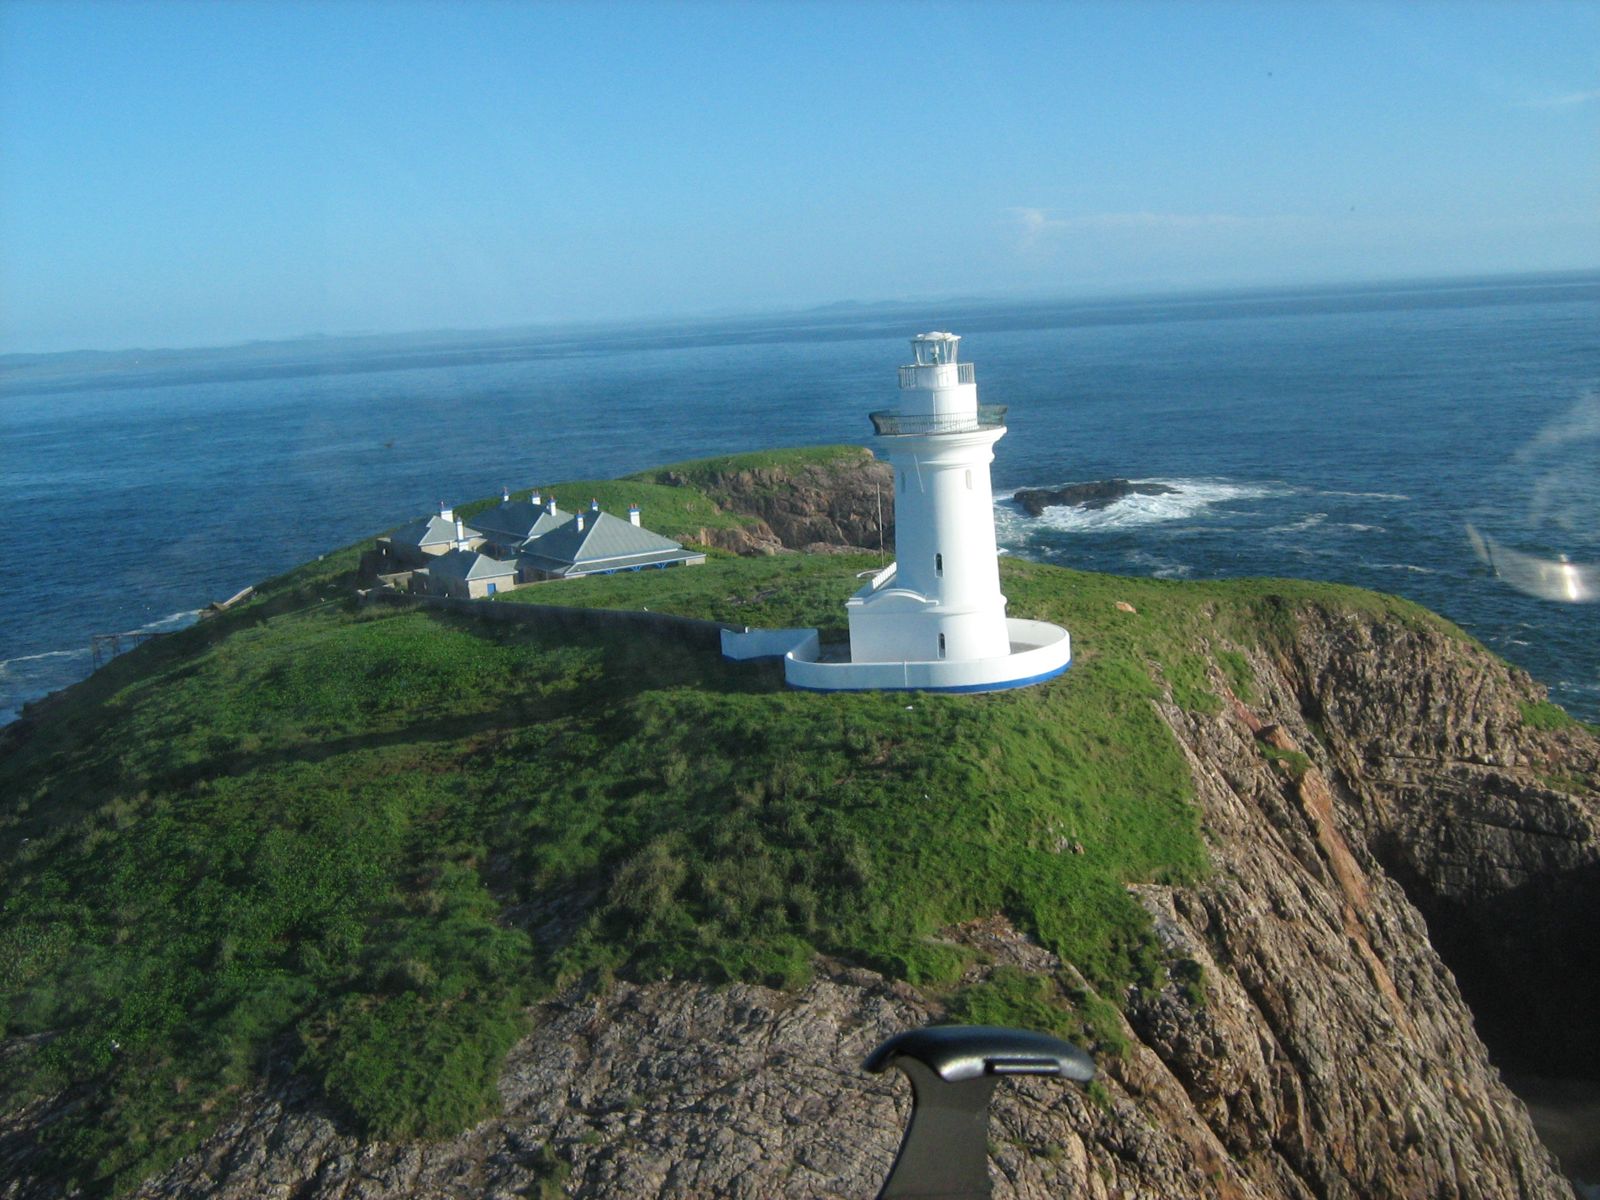
South Solitary Island — locally known as "The Light" — sits 8 km off Coffs Harbour and is the jewel of the Solitary Islands Marine Park. Its dive and snorkel sites fringe a rocky island crowned by a historic lighthouse, where the warm East Australian Current blends tropical and temperate waters. The result is an extraordinary mix of marine life: Grey Nurse Sharks gather in numbers at Manta Arch, while cleaner stations, gutters, and boulder gardens at sites like Cleaner Station teem with Blue Groper, Loggerhead Turtles, Eagle Rays, Wobbegongs, and colourful tropical fish. Water depths range from 5–20 m, making it ideal for both snorkel tours and diving adventures. Access is exclusively by charter boat from Coffs Harbour Marina.
South Solitary Island Dive Sites
IntermediateGO
GO
It's a go.
Showing last known conditions
Wave Height 0.1 mSwell Period 6.5 sWind Speed 1.5 knPrecipitation 0.0 mmTidal Phase flood
Last evaluated
 © JWarnes
DANGER: Explicit Risks Present
South Solitary Island Dive Sites has hazards marked as danger. Entering the water here means you may face serious risks to your personal safety.
- Rapid ascent risk danger
The deeper mooring line (21 m) can cause divers to misjudge ascent rates, increasing decompression sickness risk. Always use the mooring line for ascent.
- Deep water with no standing bottom danger
Snorkeling depths range from 5-20m with no shallow areas to stand; snorkelers must be competent swimmers comfortable in deep water with no floor beneath them.
- Depth risk / Decompression sickness danger
The mooring lies in 21 m of water; gutters drop to 30 m. Inexperienced snorkelers or divers can exceed depth limits. Rapid ascents from depth risk decompression sickness.
- Depth Hazard danger
Mooring is in 21m with gutters descending to 30m. Inexperienced divers risk exceeding no-deco limits or rapid ascent causing decompression sickness.
The spot
Community-maintained
Community contribution: submitted by Daniel
Know before you go
Logged by the community, confirmed by mods
High risk: Rapid ascent risk
The deeper mooring line (21 m) can cause divers to misjudge ascent rates, increasing decompression sickness risk. Always use the mooring line for ascent.
High risk: Deep water with no standing bottom
Snorkeling depths range from 5-20m with no shallow areas to stand; snorkelers must be competent swimmers comfortable in deep water with no floor beneath them.
High risk: Depth risk / Decompression sickness
The mooring lies in 21 m of water; gutters drop to 30 m. Inexperienced snorkelers or divers can exceed depth limits. Rapid ascents from depth risk decompression sickness.
High risk: Depth Hazard
Mooring is in 21m with gutters descending to 30m. Inexperienced divers risk exceeding no-deco limits or rapid ascent causing decompression sickness.
Moderate risk: Strong ocean currents
The East Australian Current can create strong north-to-south currents around the island, making it difficult to swim against and potentially sweeping snorkellers around the eastern side.
Moderate risk: Ocean swells and surge
Exposed eastern aspect can receive significant ocean swell, creating strong surge conditions around the boulder reef and ledges.
Moderate risk: Strong currents
Tidal currents can run strongly around the island, especially on the eastern side near The Gantry.
Moderate risk: Swell and surge
Exposed ocean site subject to swell and surge that can push snorkellers against the boulder wall, especially in southerly conditions.
Moderate risk: Remote offshore location
Located 8 km offshore with no shore access — emergency evacuation is via boat only, and conditions can change rapidly.
Moderate risk: Ocean Swell and Surge
The exposed offshore location means ocean swells can create significant surge around the boulders, making conditions challenging for inexperienced snorkelers.
Moderate risk: Depth and Decompression Risk
Site depth ranges from 12-25m. Inexperienced snorkellers or divers can easily exceed depth limits or risk rapid ascents leading to decompression sickness.
Moderate risk: East Australian Current
Strong currents can sweep around the island, typically north-to-south, making it difficult to swim against or dive from an unattended boat.
Moderate risk: Depth hazard
Bottom depths reach 30m; multi-level diving principles required to avoid exceeding no-deco limits or rapid ascent risk.
Moderate risk: Depth hazards
Mooring depth at 21 m, with gutters tailing to 30 m. Inexperienced snorkelers/divers can easily exceed safe limits. Multi-level dive planning is essential.
Moderate risk: Ocean currents (East Australian Current)
Strong north-to-south currents can sweep around the island, making it difficult to start or finish at the mooring. Currents can be too strong to swim against.
Moderate risk: Open ocean swell
The island is fully exposed to Pacific Ocean swells; surface conditions can become too choppy or rough for snorkeling with no lee-side shelter guaranteed.
Moderate risk: Strong East Australian Current
The current sweeps north-to-south around the island and can be too strong to swim against, making entry and exit difficult. Strong currents attract pelagics but can push divers away from the mooring.
Moderate risk: Strong drift currents
The East Australian Current sweeps north to south around the island. Once committed to the drift, swimming against the current is extremely difficult.
Moderate risk: Exposed offshore location
South Solitary Island lies ~8 km offshore; conditions can change rapidly with wind and swell. Requires boat access and surface support.
Moderate risk: Depth & Decompression Risk
Manta Arch's mooring sits in 21 m of water; gutters extend to 30 m. Inexperienced snorkelers/divers can exceed depth limits and risk decompression sickness on rapid ascent.
Moderate risk: Depth and rock ledges
The boulder wall drops from shallow to 18m+, with gutters and ridges that can disorient snorkellers. Rapid ascents from depth pose decompression risks.
Moderate risk: Depth / Decompression Risk
Moorings sit at 12–21 m with gutters trailing to 30 m. Inexperienced divers can easily exceed dive table limits or experience rapid ascent leading to decompression sickness.
Moderate risk: Strong North-South Current (EAC)
The East Australian Current can create powerful north-to-south currents around the island, making entry, exit and swimming difficult. Current can sweep divers around the eastern side.
Moderate risk: Strong Ocean Currents
The East Australian Current can create strong north-to-south currents around the island, making drift conditions challenging. Current can be too strong to swim against.
Moderate risk: Swell and Rough Seas
Exposed offshore island site; after windy periods the sea can remain rough, impacting entry and exit.
Moderate risk: Depth Management
Mooring in 12-18m water with deeper gutters dropping to 21m+; rapid ascents risk decompression sickness.
Moderate risk: Depth risk at Manta Arch
Mooring is in 21m of water; inexperienced divers can exceed table limits or incur decompression sickness if they follow bottom contours back to the mooring.
Moderate risk: Strong tidal currents
The East Australian Current can create powerful north-to-south currents around the island, making it difficult to swim against and complicating entry/exit from the boat.
Moderate risk: Depth and decompression risk
Moorings at sites like Manta Arch are in 21m of water. Inexperienced swimmers may exceed safe depth limits or ascend too rapidly, risking decompression sickness.
Moderate risk: Ocean currents
The East Australian Current can create strong north-to-south currents around the island, making swimming against the flow difficult.
Moderate risk: Strong ocean currents (East Australian Current)
The EAC can produce strong north-to-south currents around the island, making it difficult to swim against and potentially sweeping divers/snorkelers past the island's eastern side. These currents are most prevalent during warmer months.
Low risk: Boat traffic
The island is accessed only by boat; snorkellers share waters with dive charter vessels and boat traffic entering/exiting mooring areas.
Low risk: Deep drop-offs near shore
Some snorkelling areas adjacent to dive sites can drop from shallow boulder fields to deeper water (15m+) quickly, which may surprise inexperienced snorkellers.
Low risk: Deep water proximity
Reef drops quickly into deeper water (10–25 m+); snorkelers should stay close to the reef edge and be confident in open water.
Low risk: Camouflaged wobbegong sharks
Spotted wobbegong sharks rest camouflaged on boulders and ledges; accidental contact or disturbance can result in a defensive bite.
Low risk: Sharp boulders and overhangs
The wall is formed of large jagged boulders and overhangs where snorkellers can scrape hands, knees, or fins if not careful.
Low risk: Grey Nurse Shark Aggregation
South Solitary is a known aggregation site for critically endangered grey nurse sharks. While generally docile, their presence demands respectful distance and calm behaviour.
Low risk: Cave/Cavern Environment
Archie's Cave features enclosed spaces and swim-through passages that require confidence and good buoyancy control to navigate safely.
Low risk: Swell exposure
The island is fully exposed to the open Pacific Ocean; sea conditions can change quickly, impacting mooring and snorkel safety.
Low risk: Depth (5–20 m)
Snorkel and dive sites range from 5 to 20 m deep with no shallow bottom to stand on. Inexperienced divers risk exceeding no-decompression limits or rapid ascent.
Low risk: Variable visibility and swell
Snorkel trips require visibility of at least 15 m and calm surface conditions. Swell and choppy seas can cause trip cancellations or hazardous conditions.
Low risk: Remote island access
The island is 8 km offshore with no shore entry — entirely dependent on boat charter. No immediate emergency services on site.
Low risk: Variable visibility
Water clarity is highly weather-dependent; trips may be postponed or cancelled if visibility drops below 15m, and conditions can change rapidly.
Low risk: Variable surge and swell
The boulder fields and gutters experience significant surge during increased swell, making navigation around large rocks hazardous.
Low risk: Rough Surface Conditions
Exposed offshore island with frequent swell and choppy conditions. Snorkel trips are often cancelled due to rough seas or insufficient visibility (minimum 15 m required).
Low risk: Marine Life Hazards
Grey Nurse Sharks are present year-round (protected species, generally docile). Divers must follow code of conduct and approach carefully to avoid startling them.
Low risk: Ocean surge (shallow depths)
Surge can be strong above 10 metres, especially on a southerly swell or during spring tides. Requires timing fin kicks with the ocean's pulse.
Low risk: Northerly wind chop
Northerly winds can create surface chop on the boat ride and at the site, making entry/exit less comfortable.
Low risk: Strong Surge Around Arch
The archway and gutter system can channel strong surge and current, especially on incoming tides, making navigation tricky.
Low risk: Boat Traffic
Charter and private boats moor at the site; divers must ascend via the mooring line to avoid boat strike.
Low risk: Ocean swell
Swell and wave action affect all sides of the island. Even in shelter there is almost always some wave chop.
Low risk: Deep water (5–20 m)
Snorkelling sites are 5–20 m deep with no standing bottom — constant swimming is required.
Low risk: Swell and surge exposure
Being an exposed offshore island, ocean swells can generate surge along the rocky shoreline, particularly on the eastern side. Snorkelers should stay on the leeward (western) side in rougher conditions.
Low risk: Rocky entry and exit
Access is by boat only with no beach landing; entry/exit involves jumping from a vessel into open water near rocky boulder terrain. Care needed to avoid contact with marine growth and sea urchins.
Low risk: Depth variation near shore
Boulder drop-offs can descend rapidly from shallow snorkeling depths (3-5m) to 15-20m+, which may surprise inexperienced snorkelers who venture too far from the boat.
Low risk: Rough surface conditions
Swell and wind can create choppy surface conditions; snorkelling requires good swimming ability and previous experience.
Low risk: Deep water (5-20 m)
Snorkelling sites range from 5-20 m depth with no shallow standing areas; snorkellers must be comfortable in deep water.
Low risk: Weather-dependent access
Trips are weather-dependent and frequently cancelled or postponed when visibility drops below 15 m or seas are rough.
Low risk: Depth hazard near mooring
The mooring line is in 21 m of water; inexperienced snorkelers or divers can inadvertently descend beyond safe limits or ascend too rapidly, risking decompression sickness.
Low risk: Variable Depths & Drop-offs
Some mooring areas drop to 18-21 m; deeper gutters extend further. Snorkellers should remain aware of depth changes and currents near deeper drop-offs.
Wildlife Guide
No wildlife notes for this spot yet.
Gallery
13 photos from the community
Getting in
Snorkel tour
Entry
Access is by charter boat only from Coffs Harbour Marina. Jetty Dive Centre operates regular snorkel and dive charters to South Solitary Island, approximately 30–40 minutes by boat. Bookings are essential.
Parking & facilities
Parking is available at the Coffs Harbour Marina precinct on Harbour Drive, Coffs Harbour.
parkingtoiletsdrinking_water
Snorkel tours ~$170 per person (includes wetsuit, mask, snorkel, fins, and morning tea). Dive charter prices vary — contact Jetty Dive. Bookings essential.
Spot Map
Community
Gallery ┬╖ 13 photos
Trust
Is this spot real, accurate, still loved?
Spots near New South Wales
No nearby spots yet.
Needs verification
Quick verify
One tap helps the community keep this spot honest.
About this data
- Conditions last evaluated
- Spot data last updated
- Data sources
- Open-Meteo (marine & weather conditions), tide predictions via UTide, community contributors (descriptions, hazards, marine life).
- License
- Spot content licensed under CC BY-SA 4.0. How's the Spot is open source.
Weather & swell ┬╖ Open-Meteo marine & weather APIs Tides ┬╖ UTide harmonic analysis Sea & safety ┬╖ community reports